Previously, I wrote about deploying Kubernetes clusters using the Nutanix Kubernetes Engine.
The next few articles will cover the day-two operations that make managing Kubernetes clusters easier.
Today we will look at how to expand a Kubernetes cluster or how to shrink it using NKE.
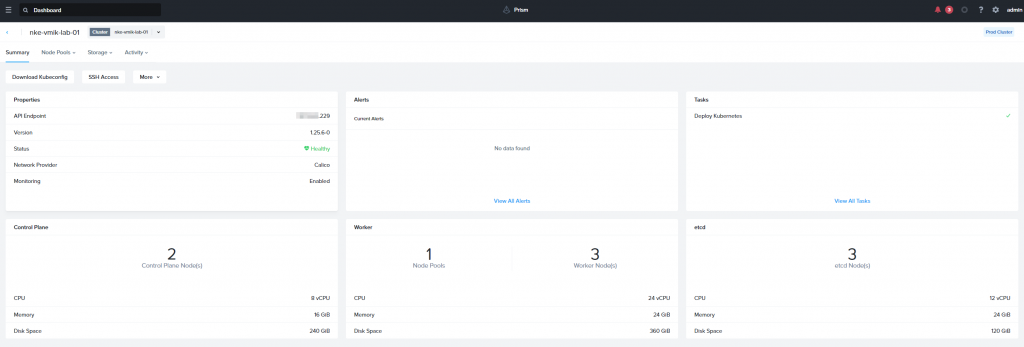
We will begin with a brand new Kubernetes cluster, deployed in the previous article, that consists of 2 control plane nodes, 3 etcd, and 3 worker nodes:
# kubectl get nodes -o wide
NAME                              STATUS   ROLES                  AGE   VERSION   INTERNAL-IP    EXTERNAL-IP   OS-IMAGE                KERNEL-VERSION                 CONTAINER-RUNTIME
nke-vmik-lab-01-2c9716-master-0   Ready    control-plane,master   15d   v1.25.6   192.168.22.240   <none>        CentOS Linux 7 (Core)   3.10.0-1160.108.1.el7.x86_64   containerd://1.6.16
nke-vmik-lab-01-2c9716-master-1   Ready    control-plane,master   15d   v1.25.6   192.168.22.231   <none>        CentOS Linux 7 (Core)   3.10.0-1160.108.1.el7.x86_64   containerd://1.6.16
nke-vmik-lab-01-2c9716-worker-0   Ready    node                   15d   v1.25.6   192.168.22.236   <none>        CentOS Linux 7 (Core)   3.10.0-1160.108.1.el7.x86_64   containerd://1.6.16
nke-vmik-lab-01-2c9716-worker-1   Ready    node                   15d   v1.25.6   192.168.22.235   <none>        CentOS Linux 7 (Core)   3.10.0-1160.108.1.el7.x86_64   containerd://1.6.16
nke-vmik-lab-01-2c9716-worker-2   Ready    node                   15d   v1.25.6   192.168.22.234   <none>        CentOS Linux 7 (Core)   3.10.0-1160.108.1.el7.x86_64   containerd://1.6.16
In this cluster, I have a deployment with a set of Nginx containers:
# kubectl get pods -n vmik-test  -o wide
NAME                               READY   STATUS    RESTARTS   AGE     IP               NODE                              NOMINATED NODE   READINESS GATES
nginx-deployment-cd55c47f5-5d8ql   1/1     Running   0          3h19m   172.20.249.207   nke-vmik-lab-01-2c9716-worker-2   <none>           <none>
nginx-deployment-cd55c47f5-8dg8f   1/1     Running   0          3h19m   172.20.87.15     nke-vmik-lab-01-2c9716-worker-0   <none>           <none>
nginx-deployment-cd55c47f5-bnvnx   1/1     Running   0          3h19m   172.20.87.14     nke-vmik-lab-01-2c9716-worker-0   <none>           <none>
nginx-deployment-cd55c47f5-cnmnj   1/1     Running   0          3h19m   172.20.87.12     nke-vmik-lab-01-2c9716-worker-0   <none>           <none>
nginx-deployment-cd55c47f5-jmr99   1/1     Running   0          3h19m   172.20.219.78    nke-vmik-lab-01-2c9716-worker-1   <none>           <none>
nginx-deployment-cd55c47f5-m5blv   1/1     Running   0          3h19m   172.20.249.206   nke-vmik-lab-01-2c9716-worker-2   <none>           <none>
nginx-deployment-cd55c47f5-sxs5d   1/1     Running   0          3h19m   172.20.219.79    nke-vmik-lab-01-2c9716-worker-1   <none>           <none>
nginx-deployment-cd55c47f5-tf6gh   1/1     Running   0          3h19m   172.20.249.208   nke-vmik-lab-01-2c9716-worker-2   <none>           <none>
nginx-deployment-cd55c47f5-w6kx6   1/1     Running   0          3h19m   172.20.87.13     nke-vmik-lab-01-2c9716-worker-0   <none>           <none>
nginx-deployment-cd55c47f5-wc5f5   1/1     Running   0          3h19m   172.20.219.80    nke-vmik-lab-01-2c9716-worker-1   <none>           <none>
In this article we will talk about scaling up and shrinking our cluster, so there are operations you can do and you can’t:
- You can add more workers to the worker pool;
- You can delete workers from the pool;
- You can create a new worker pool;
- You can’t resize existing workers – change CPU/RAM/HDD;
- You can’t increase control plane nodes count, or etcd nodes.
Now let’s look at this in action. Click on Node Pools:

This menu provides access to the:
- Control Plane – you can’t do anything here, but look at the node’s parameters and IP address;
- etcd – same as the Control Plane;
- Worker – add or remove workers from an existing pool, create a new pool, add labels, etc.
Click on Worker:
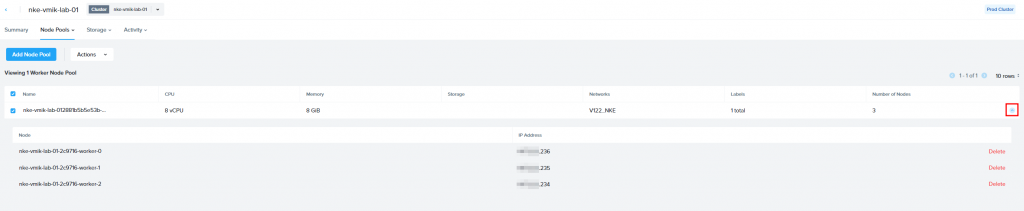
In this window, we will see an existing pool, which includes 3 worker nodes and those resources.
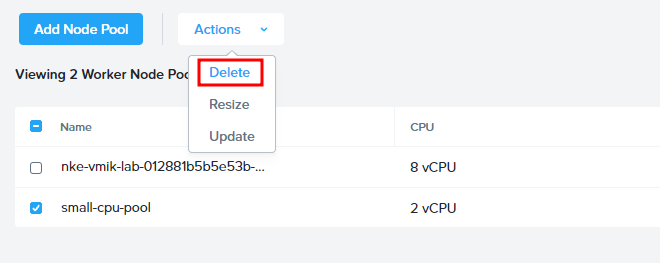
Clicking on the Actions button we will see three options:
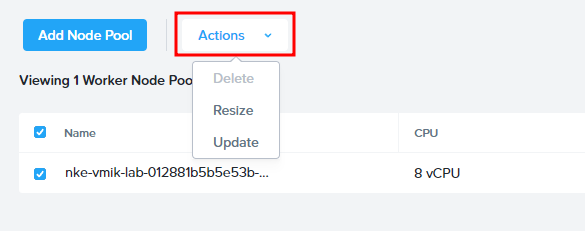
We can’t delete a default pool because many system containers are running there. This option is grayed in this example.
Let’s click Update:
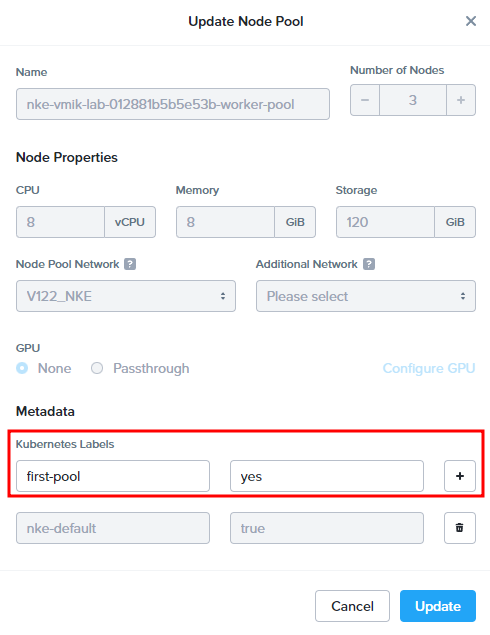
As I wrote, we can’t change the resources of the existing nodes. This menu can show us the resources and provide the ability to add Kubernetes labels to the nodes.
# kubectl describe nodes nke-vmik-lab-01-2c9716-worker-0
Name:               nke-vmik-lab-01-2c9716-worker-0
Roles:              node
Labels:
…
                    nke-default=true
                    first-pool=yes
…
In the output above, you can see that NKE has added a label to the worker node.
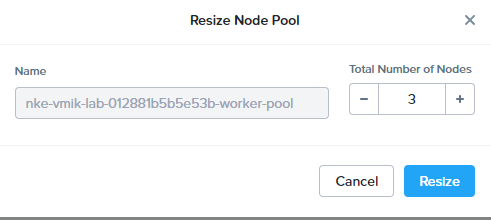
Now, let’s look at Resize and how it works:

By default, you can see the total number of nodes in the pool. You can increase or decrease it.
Let’s add one more worker by increasing the total number of nodes to four and click resize:
We will see a new task and status:

At this moment, NKE is deploying a new VM and joining it to the Kubernetes cluster.
The procedure shouldn’t take a long time. After it finishes, we can see a new worker in the pool:

# kubectl get nodes -o wide
NAME                              STATUS   ROLES                  AGE   VERSION   INTERNAL-IP    EXTERNAL-IP   OS-IMAGE                KERNEL-VERSION                 CONTAINER-RUNTIME
nke-vmik-lab-01-2c9716-master-0   Ready    control-plane,master   15d   v1.25.6   192.168.22.240   <none>        CentOS Linux 7 (Core)   3.10.0-1160.108.1.el7.x86_64   containerd://1.6.16
nke-vmik-lab-01-2c9716-master-1   Ready    control-plane,master   15d   v1.25.6   192.168.22.231   <none>        CentOS Linux 7 (Core)   3.10.0-1160.108.1.el7.x86_64   containerd://1.6.16
nke-vmik-lab-01-2c9716-worker-0   Ready    node                   15d   v1.25.6   192.168.22.236   <none>        CentOS Linux 7 (Core)   3.10.0-1160.108.1.el7.x86_64   containerd://1.6.16
nke-vmik-lab-01-2c9716-worker-1   Ready    node                   15d   v1.25.6   192.168.22.235   <none>        CentOS Linux 7 (Core)   3.10.0-1160.108.1.el7.x86_64   containerd://1.6.16
nke-vmik-lab-01-2c9716-worker-2   Ready    node                   15d   v1.25.6   192.168.22.234   <none>        CentOS Linux 7 (Core)   3.10.0-1160.108.1.el7.x86_64   containerd://1.6.16
nke-vmik-lab-01-2c9716-worker-3   Ready    node                   11m   v1.25.6   192.168.22.237   <none>        CentOS Linux 7 (Core)   3.10.0-1160.108.1.el7.x86_64   containerd://1.6.16
Let’s scale an existing deployment to run a few containers on the new worker:
# kubectl scale deployment -n vmik-test nginx-deployment --replicas 15
deployment.apps/nginx-deployment scaled
Four containers were started on this node:
# kubectl get pods -n vmik-test -o wide | grep worker-3
nginx-deployment-cd55c47f5-mx264   1/1     Running   0          84s     172.20.165.131   nke-vmik-lab-01-2c9716-worker-3   <none>           <none>
nginx-deployment-cd55c47f5-ptswq   1/1     Running   0          84s     172.20.165.132   nke-vmik-lab-01-2c9716-worker-3   <none>           <none>
nginx-deployment-cd55c47f5-r5btn   1/1     Running   0          84s     172.20.165.129   nke-vmik-lab-01-2c9716-worker-3   <none>           <none>
nginx-deployment-cd55c47f5-x47lk   1/1     Running   0          84s     172.20.165.130   nke-vmik-lab-01-2c9716-worker-3   <none>           <none>
Now let’s delete Worker-3 by clicking the Delete button in the NKE interface:

We may see that four containers were redeployed on the other nodes, and no one runs on worker 3:
# kubectl get pods -n vmik-test  -o wide
NAME                               READY   STATUS    RESTARTS   AGE     IP               NODE                              NOMINATED NODE   READINESS GATES
nginx-deployment-cd55c47f5-5d8ql   1/1     Running   0          4h15m   172.20.249.207   nke-vmik-lab-01-2c9716-worker-2   <none>           <none>
nginx-deployment-cd55c47f5-8dg8f   1/1     Running   0          4h15m   172.20.87.15     nke-vmik-lab-01-2c9716-worker-0   <none>           <none>
nginx-deployment-cd55c47f5-b92p6   1/1     Running   0          18s     172.20.219.81    nke-vmik-lab-01-2c9716-worker-1   <none>           <none>
nginx-deployment-cd55c47f5-bnvnx   1/1     Running   0          4h15m   172.20.87.14     nke-vmik-lab-01-2c9716-worker-0   <none>           <none>
nginx-deployment-cd55c47f5-cnmnj   1/1     Running   0          4h15m   172.20.87.12     nke-vmik-lab-01-2c9716-worker-0   <none>           <none>
nginx-deployment-cd55c47f5-cv687   1/1     Running   0          18s     172.20.219.82    nke-vmik-lab-01-2c9716-worker-1   <none>           <none>
nginx-deployment-cd55c47f5-dlncf   1/1     Running   0          18s     172.20.249.210   nke-vmik-lab-01-2c9716-worker-2   <none>           <none>
nginx-deployment-cd55c47f5-jmr99   1/1     Running   0          4h15m   172.20.219.78    nke-vmik-lab-01-2c9716-worker-1   <none>           <none>
nginx-deployment-cd55c47f5-m5blv   1/1     Running   0          4h15m   172.20.249.206   nke-vmik-lab-01-2c9716-worker-2   <none>           <none>
nginx-deployment-cd55c47f5-mc6qm   1/1     Running   0          3m34s   172.20.249.209   nke-vmik-lab-01-2c9716-worker-2   <none>           <none>
nginx-deployment-cd55c47f5-sxs5d   1/1     Running   0          4h15m   172.20.219.79    nke-vmik-lab-01-2c9716-worker-1   <none>           <none>
nginx-deployment-cd55c47f5-tf6gh   1/1     Running   0          4h15m   172.20.249.208   nke-vmik-lab-01-2c9716-worker-2   <none>           <none>
nginx-deployment-cd55c47f5-w6kx6   1/1     Running   0          4h15m   172.20.87.13     nke-vmik-lab-01-2c9716-worker-0   <none>           <none>
nginx-deployment-cd55c47f5-wc5f5   1/1     Running   0          4h15m   172.20.219.80    nke-vmik-lab-01-2c9716-worker-1   <none>           <none>
nginx-deployment-cd55c47f5-z94ch   1/1     Running   0          18s     172.20.87.16     nke-vmik-lab-01-2c9716-worker-0   <none>           <none>
And we have three workers again:
# kubectl get nodes
NAME                              STATUS   ROLES                  AGE   VERSION
nke-vmik-lab-01-2c9716-master-0   Ready    control-plane,master   15d   v1.25.6
nke-vmik-lab-01-2c9716-master-1   Ready    control-plane,master   15d   v1.25.6
nke-vmik-lab-01-2c9716-worker-0   Ready    node                   15d   v1.25.6
nke-vmik-lab-01-2c9716-worker-1   Ready    node                   15d   v1.25.6
nke-vmik-lab-01-2c9716-worker-2   Ready    node                   15d   v1.25.6
Now, let’s shrink our pool to one node using the resize button as before:
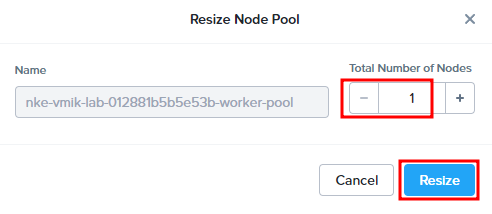
We decided to shrink a default pool from 3 workers to 1, and NKE needs to delete two worker nodes.
This is a step-by-step procedure, and workers will be deleted one by one. Before deleting, NKE drains the node (I believe it uses something like kubectl drain), and pods restart on other nodes in the cluster.
At each step, NKE will check the Kubernetes cluster’s health and ensure it’s OK before moving on to the next step.
We can see that pods from worker 2 were restarted on workers 0 and 1, while worker 2 is deleting:
# kubectl get pods -n vmik-test -o wide
NAME                               READY   STATUS    RESTARTS   AGE     IP              NODE                              NOMINATED NODE   READINESS GATES
nginx-deployment-cd55c47f5-8dg8f   1/1     Running   0          4h24m   172.20.87.15    nke-vmik-lab-01-2c9716-worker-0   <none>           <none>
nginx-deployment-cd55c47f5-b92p6   1/1     Running   0          9m24s   172.20.219.81   nke-vmik-lab-01-2c9716-worker-1   <none>           <none>
nginx-deployment-cd55c47f5-bnvnx   1/1     Running   0          4h24m   172.20.87.14    nke-vmik-lab-01-2c9716-worker-0   <none>           <none>
nginx-deployment-cd55c47f5-cnmnj   1/1     Running   0          4h24m   172.20.87.12    nke-vmik-lab-01-2c9716-worker-0   <none>           <none>
nginx-deployment-cd55c47f5-cv687   1/1     Running   0          9m24s   172.20.219.82   nke-vmik-lab-01-2c9716-worker-1   <none>           <none>
nginx-deployment-cd55c47f5-g2v69   1/1     Running   0          87s     172.20.219.84   nke-vmik-lab-01-2c9716-worker-1   <none>           <none>
nginx-deployment-cd55c47f5-gj2zf   1/1     Running   0          87s     172.20.219.85   nke-vmik-lab-01-2c9716-worker-1   <none>           <none>
nginx-deployment-cd55c47f5-jmr99   1/1     Running   0          4h24m   172.20.219.78   nke-vmik-lab-01-2c9716-worker-1   <none>           <none>
nginx-deployment-cd55c47f5-jnzls   1/1     Running   0          87s     172.20.87.22    nke-vmik-lab-01-2c9716-worker-0   <none>           <none>
nginx-deployment-cd55c47f5-lqd2q   1/1     Running   0          87s     172.20.219.86   nke-vmik-lab-01-2c9716-worker-1   <none>           <none>
nginx-deployment-cd55c47f5-mj98x   1/1     Running   0          87s     172.20.87.18    nke-vmik-lab-01-2c9716-worker-0   <none>           <none>
nginx-deployment-cd55c47f5-sxs5d   1/1     Running   0          4h24m   172.20.219.79   nke-vmik-lab-01-2c9716-worker-1   <none>           <none>
nginx-deployment-cd55c47f5-w6kx6   1/1     Running   0          4h24m   172.20.87.13    nke-vmik-lab-01-2c9716-worker-0   <none>           <none>
nginx-deployment-cd55c47f5-wc5f5   1/1     Running   0          4h24m   172.20.219.80   nke-vmik-lab-01-2c9716-worker-1   <none>           <none>
nginx-deployment-cd55c47f5-z94ch   1/1     Running   0          9m24s   172.20.87.16    nke-vmik-lab-01-2c9716-worker-0   <none>           <none>
And.., just to demonstrate. An ERROR! After deleting one worker, the task was stopped because Kubernetes cluster health was far from normal after deleting the first worker and NKE noticed that and stopped the next task:

Pro tip: check /home/nutanix/data/logs/karbon_core.out log file.
This log contains all the information you need to troubleshoot the NKE issues. This time we can see a problem with a Calico deployment:
[DEBUG] Verifying calico-typha deployment in kube-system namespace
[DEBUG] expecting 3 available replicas of calico-typha deployment in kube-system namespace. Currently running: 2
[DEBUG] expecting 3 available replicas of calico-typha deployment in kube-system namespace. Currently running: 2
[DEBUG] expecting 3 available replicas of calico-typha deployment in kube-system namespace. Currently running: 2
[DEBUG] expecting 3 available replicas of calico-typha deployment in kube-system namespace. Currently running: 2
[ERROR] Failed to verify calico addon
[INFO] Cluster 2c97168e-e34d-4a11-65bd-9ca93d39e714 is unhealthy with error :Operation timed out
To fix this issue, resize the worker pool again, but with a minimum of three nodes, as required for a production deployment:
In my case, I’ve resized the pool to 5 nodes. Sadly, node IDs didn’t start from the beginning, and now I have workers 4/5/6.
Now the cluster should be “green” again:

In this situation, we can easily shrink the cluster back to 3 nodes using resize. Nothing should happen. Don’t forget that during shrinking, the minimal number of worker nodes for a production cluster is 3.
We have looked at how to resize the worker pool, how to add nodes, how to shrink the pool, and how to manually delete the desired node. Now we know that the minimal number of worker nodes is three for a production cluster.
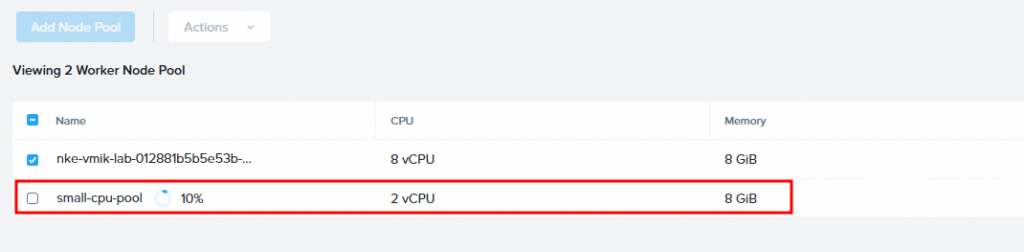
The last thing I want to show is creating a new worker pool. It may be useful when you want to deploy workers with different settings (CPU/RAM/HDD).
Click on Add Node Pool:

There, we need to specify some settings:

- Name of the pool and number of desired workers;
- CPU, Memory, and Storage properties;
- Node Pool Network – Don’t forget, that it must use IPAM and has free IPs in the pool;
- Metadata if needed.
After specifying the settings, click Add, and the procedure should begin. We can see that the new pool is deploying:
After a while, the pool will be deployed:
# kubectl get nodes
NAME                                             STATUS   ROLES                  AGE     VERSION
nke-vmik-lab-01-2c9716-master-0                  Ready    control-plane,master   15d     v1.25.6
nke-vmik-lab-01-2c9716-master-1                  Ready    control-plane,master   15d     v1.25.6
nke-vmik-lab-01-2c9716-small-cpu-pool-worker-0   Ready    node                   3m46s   v1.25.6
nke-vmik-lab-01-2c9716-small-cpu-pool-worker-1   Ready    node                   3m46s   v1.25.6
nke-vmik-lab-01-2c9716-worker-0                  Ready    node                   15d     v1.25.6
nke-vmik-lab-01-2c9716-worker-1                  Ready    node                   15d     v1.25.6
nke-vmik-lab-01-2c9716-worker-4                  Ready    node                   34m     v1.25.6
Also, no one prevents to run a container on the new nodes:
# kubectl get pods -n vmik-test  -o wide | grep small
nginx-deployment-cd55c47f5-2hlsj   1/1     Running   0          74s   172.20.193.194   nke-vmik-lab-01-2c9716-small-cpu-pool-worker-0   <none>           <none>
nginx-deployment-cd55c47f5-65s4q   1/1     Running   0          73s   172.20.76.195    nke-vmik-lab-01-2c9716-small-cpu-pool-worker-1   <none>           <none>
nginx-deployment-cd55c47f5-7zl9l   1/1     Running   0          73s   172.20.193.195   nke-vmik-lab-01-2c9716-small-cpu-pool-worker-0   <none>           <none>
nginx-deployment-cd55c47f5-ks9mr   1/1     Running   0          74s   172.20.76.194    nke-vmik-lab-01-2c9716-small-cpu-pool-worker-1   <none>           <none>
If you want to delete a newly created pool, you may notice that the delete button is inactive. To delete a non-default pool, we need to delete all workers in it or resize it to zero:

After that, we can delete the pool:
# kubectl get nodes
NAME                              STATUS   ROLES                  AGE   VERSION
nke-vmik-lab-01-2c9716-master-0   Ready    control-plane,master   16d   v1.25.6
nke-vmik-lab-01-2c9716-master-1   Ready    control-plane,master   16d   v1.25.6
nke-vmik-lab-01-2c9716-worker-0   Ready    node                   16d   v1.25.6
nke-vmik-lab-01-2c9716-worker-1   Ready    node                   16d   v1.25.6
nke-vmik-lab-01-2c9716-worker-4   Ready    node                   18h   v1.25.6
By the way, remember, as I said, that the minimum number of workers for a production cluster is three? That’s correct, but it will work even in this configuration:

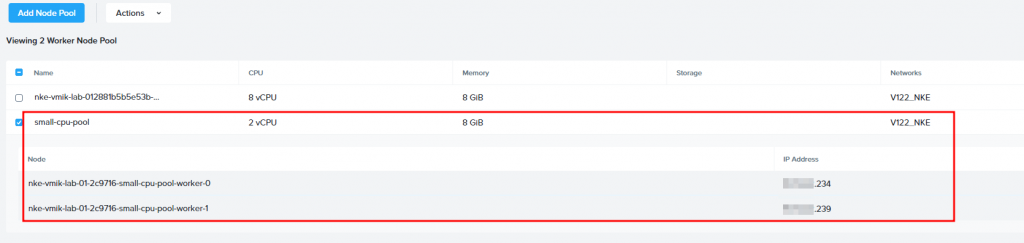
I have one worker node in the default pool and two nodes in the new one. You may remember that before we couldn’t shrink the original pool to one node, but now we can.
In this situation, if you will try to shrink small-pool, you will face an error, as we’ve faced before, because the total number of nodes will be less than three.
Notice, that we can’t delete our original pool. It should contain at least one node.
That’s all for now. I hope now you know better how to expand worker pools, how to add another one, or how to shrink them. Don’t forget about the minimum worker’s count.
![]()