Nutanix Kubernetes Engine, or NKE (formerly Karbon), is a solution to deploy and manage Kubernetes clusters in a Nutanix infrastructure.
With NKE, we can deploy Kubernetes clusters, upgrade them, add or remove workers, configure RBAC based on Prism Central, and more in a pretty simple way.
The purpose of this article is to provide a walkthrough on how to prepare a Nutanix cluster for use with NKE and how to deploy a Kubernetes cluster.
NKE deploys “vanilla” Kubernetes clusters, it’s not an upstream version, but a few versions back. The base Linux image is CentOS, maintained by Nutanix. So, you don’t need to prepare any VMs. All this work is handled by NKE.
NKE provides Nutanix CSI Driver, which leverages Nutanix Volumes and Nutanix Files to provide persistent storage. In the default setup, you can use Nutanix CSI with Nutanix Volumes, and create only ReadWriteOnce (RWO) and ReadOnlyMany (RXO) persistent storage for your stateful containers. For ReadWriteMany (RWX) persistent storage you can consider using Nutanix Files.
In addition, NKE provides Kubernetes RBAC based on Prism Central users and groups.
NKE doesn’t provide any container registries, but it does offer an easy way to connect 3rd-party registries to the deployed clusters.
Nutanix Kubernetes Engine doesn’t require any license, and you can use it right after deploying Prism Central, but the number of deployed Kubernetes clusters is limited by the Nutanix Cluster License where you are considering deploying K8s.
In the Cluster with a Starter License, you can deploy only two Kubernetes clusters. With the Pro License, you can deploy three clusters, but with the Cloud Native add-on license, it’s unlimited. Using the Ultimate license, you can deploy as many clusters as you want—it’s unlimited.
NKE is a Prism Central service that needs to be enabled. After enabling it, it will run two additional services on Prism Central:
Karbon-core is responsible for managing Kubernetes clusters. Deploy, upgrade, and so on;
Karbon-UI is responsible for providing UI via Prism Central.
Now, when we briefly look at what the Nutanix Kubernetes Engine is, let’s begin with the deployment.
In my lab environment, I will use Nutanix Community Edition, but the overall procedure should be the same for a production cluster as well.
It’s assumed that Prism Central is deployed and the Nutanix Cluster is registered with Prism Central. NTP and DNS are configured everywhere as well.
Also, you should have an Internet connection or use an HTTP proxy, which should be added to Prism Central settings.
The first step is to prepare your Nutanix cluster. There are a few necessary steps and an optional one:
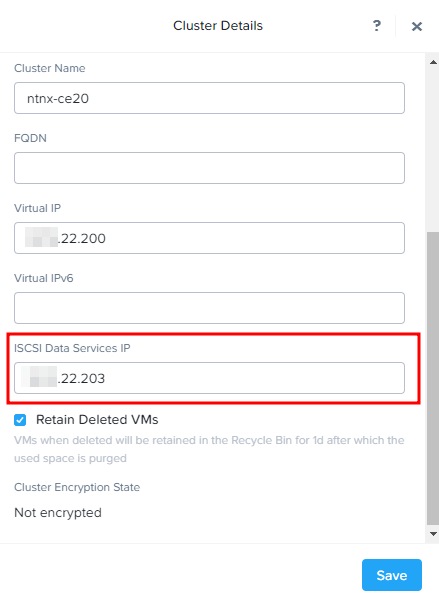
- Enable iSCSI Data Services IP – necessary;
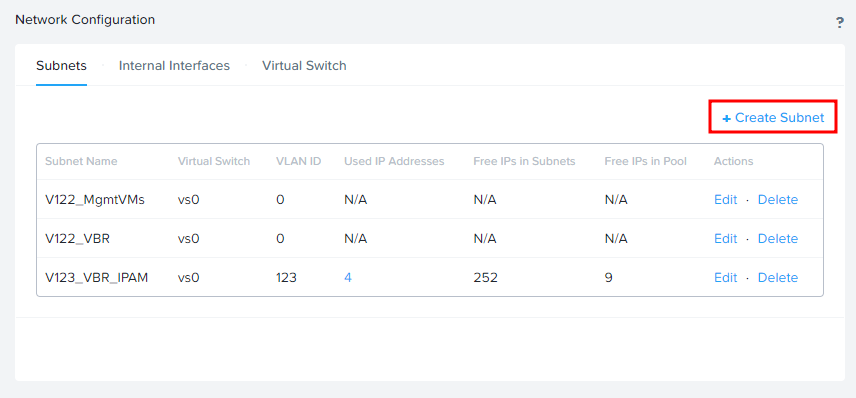
- Create a network for Kubernetes VMs; IPAM must be enabled – necessary;
- Create a separate Storage Container for NKE – optional.
You can set the iSCSI Data Services IP by clicking on the cluster name in the Prism Element interface:
Next, go to the Configuration menu – Network Configuration and click on “Create Subnet”:
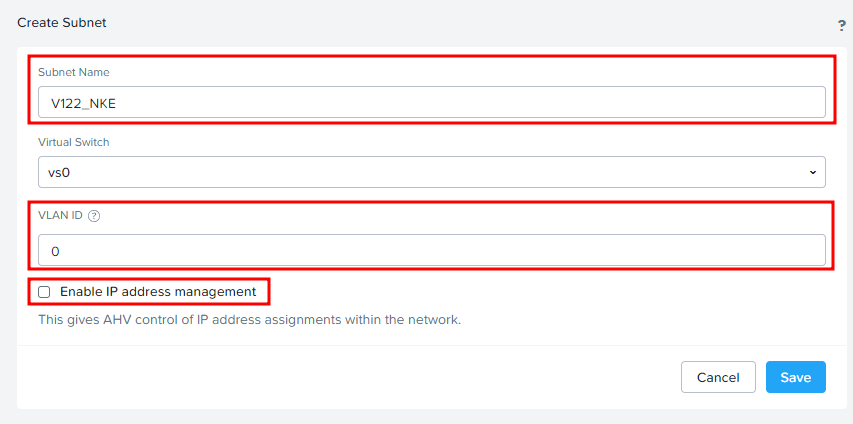
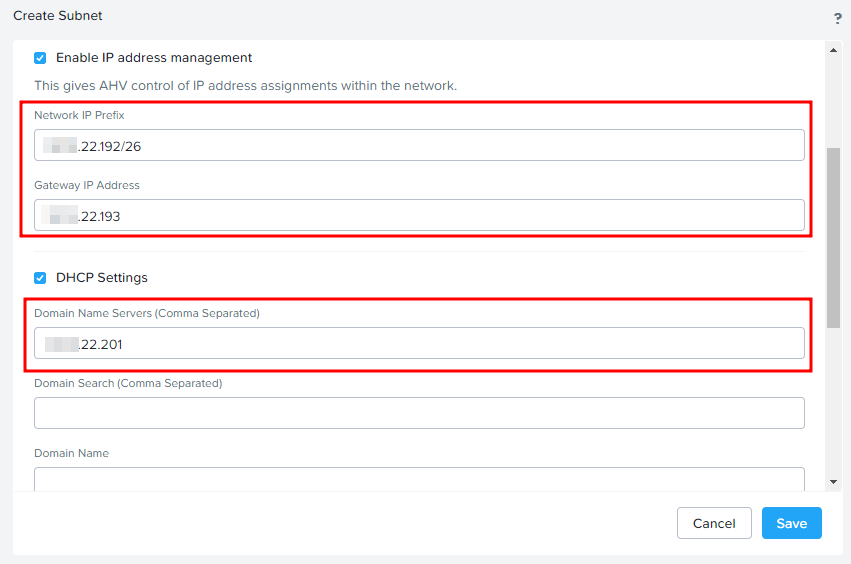
Provide the subnet name and VLAN ID if required, and click on “Enable IP address management.”:
Specify the required settings below and don’t forget the DNS servers:
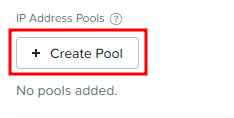
And click “Create Pool” to set the IP range, which will be used when deploying Kubernetes VMs:
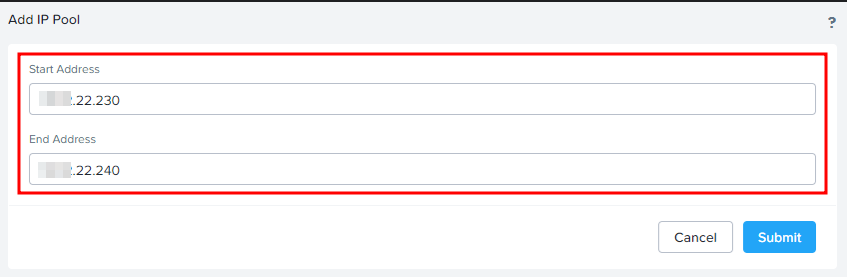
Specify the start IP address and end IP address:
The size of the pool should depend on the number of Kubernetes VMs you plan to deploy.
Click Submit on Creating Pool and Save in the Subnet creation menu.
The optional step is to create a storage container. This container will be used to store Volume groups and PVs, used by containers and NKE VMs. Go to the Storage section and click on the Storage Container button at the top right:
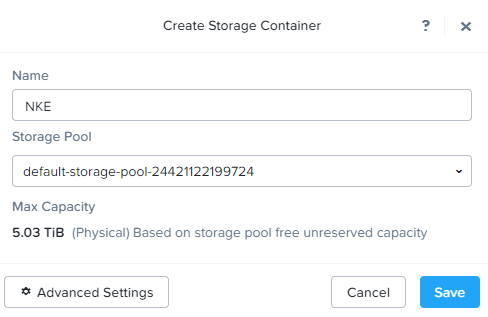
Specify the container name and limits, if required. You may also limit its size and enable compression and deduplication.
We have finished with preparation from the Nutanix Cluster side. Let’s move to the Prism Central web interface.
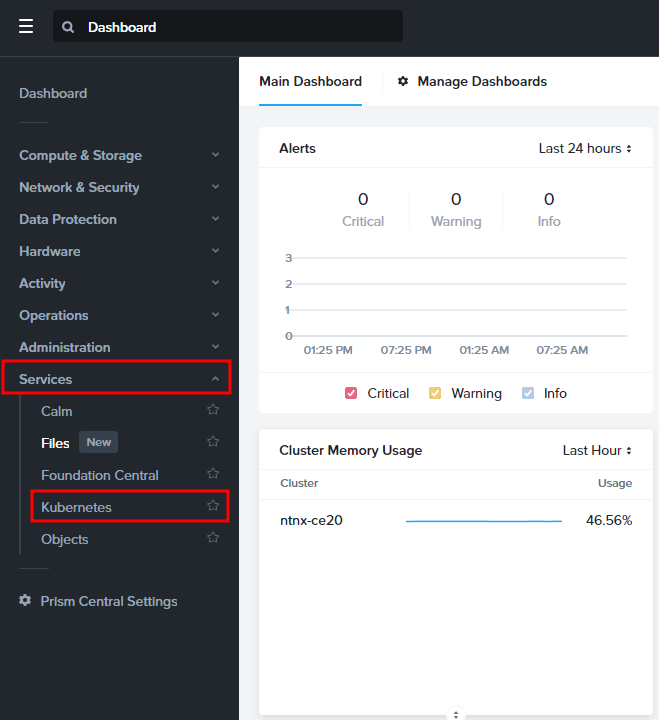
In Prism Central, open the left (Hamburger) menu and find Kubernetes under the Services section:
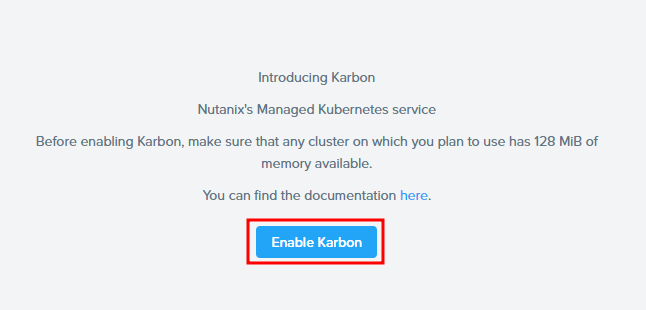
Click on “Enable Karbon” to deploy and start Nutanix Kubernetes Engine services on Prism Central:
It will take a while.
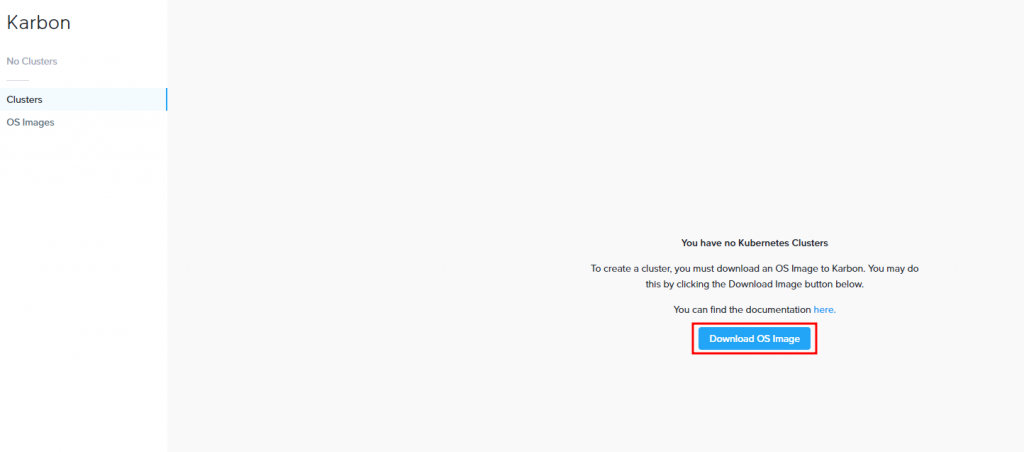
After that, you will see a Karbon UI, indicating that there are no Kubernetes clusters at the moment and no OS images. As I mentioned before, OS Image is the CentOS Linux Image used for all Kubernetes VMs, and we need to download it first. Click on Download OS Image:
The latest OS Image will start to download:

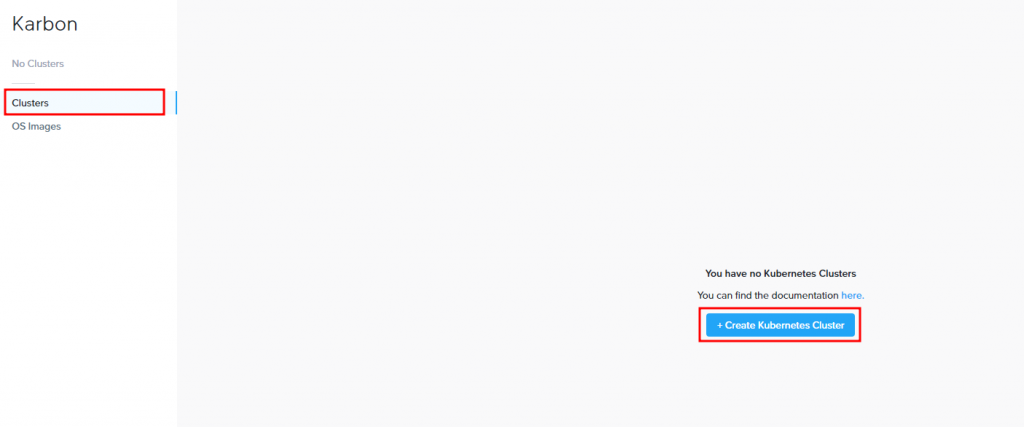
When the image is downloaded, it’s time to deploy a Kubernetes cluster. Return to the Clusters section and click on “Create Kubernetes Cluster”:
First, we need to decide on the cluster configuration – a development or production one:
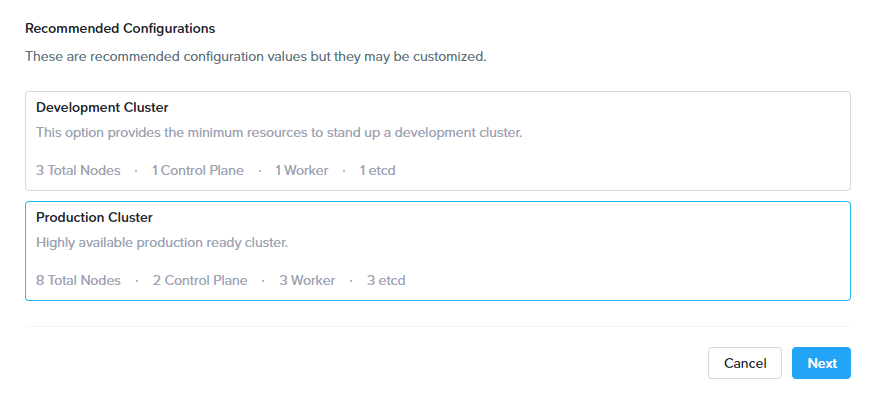
The main difference between the development and production clusters is that there is no high availability of the control plane and etcd database. Both of the services will be deployed in minimal configuration. Also, there is a minimum of one worker node.
In a production cluster you can choose different configurations:
Active-Passive for the control plane, where one node is active and the second is standby. Two nodes use a virtual IP, which is managed by keepalived. The simplest high-available deployment;
Active-Active, where the control plane can consist of 2 to 5 nodes but requires an additional external load balancer.
Both configurations require a minimum of 3 etcd nodes., but for large clusters, 5 nodes are also an option.
In this walkthrough, I will proceed with the production cluster. But you can choose a development one. The overall process is the same.
Next, we need to specify the settings:
- Kubernetes Cluster Name;
- Nutanix Cluster, where we want to deploy the Kubernetes cluster. This cluster should be registered with Prism Central;
- Select the Kubernetes version;
- Select the Host OS version.
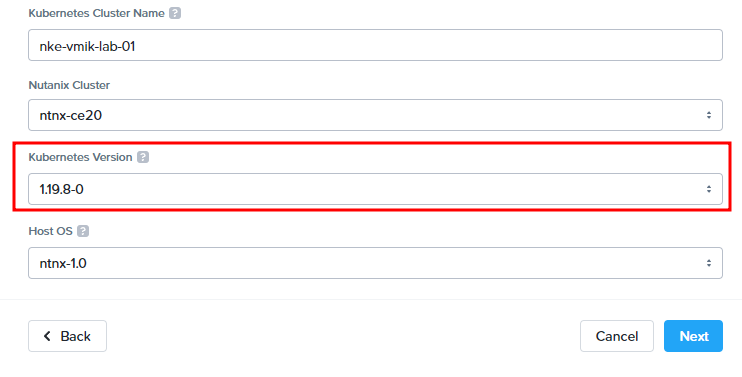
You may ask, why is the Kubernetes version too old? I didn’t mention it before to demonstrate that the Kubernetes version you want to deploy depends on the NKE version.
If we go to the Prism Central LCM section, which is responsible for updating Prism Central and its components, after the inventory we can see that the installed version of Nutanix Kubernetes Engine is 2.2.3, but version 2.8.0 is available:
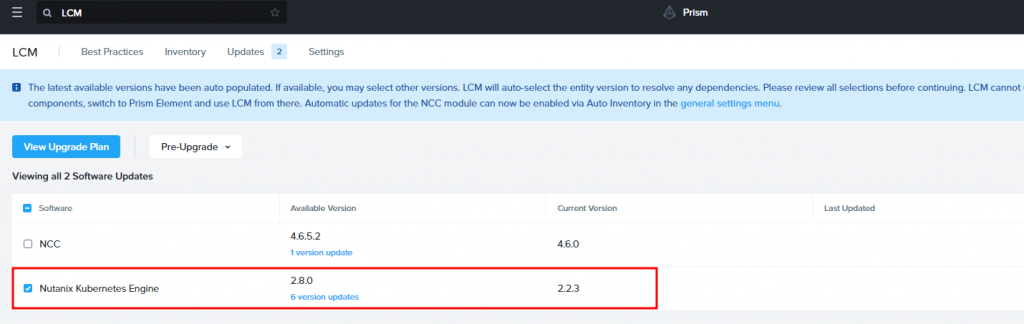
So, we need to update NKE first. Mark the checkbox and click on View Upgrade Plan to proceed with the NKE service update.
During the update, running Kubernetes clusters won’t be affected, but you may encounter issues with authentication or managing such clusters because of NKE service restarts. After the update, everything should be fine.
When the update is finished, you may first see that there are no OS images again because OS Image ntnx-1.0 is EOL since NKE version 2.4.0. Now we need to download a new version of the image, which is ntnx-1.5.1:

In the future, when you have already deployed an operational cluster, you need to stay up-to-date with the versions of OS Images and Kubernetes. Otherwise, you won’t be able to update NKE if some of your components are EOL in the newest NKE release.
Both updates can be done non-disruptively using NKE. I will probably cover it in a future article.
When we’ve finished downloading, let’s return to the cluster creation procedure and check what has been changed:
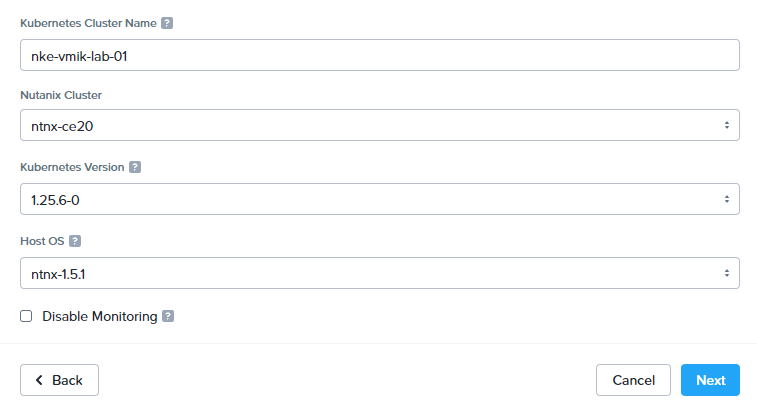
We can see that the latest supported version of NKE Kubernetes is 1.25.6, and the OS image is ntnx-1.5.1. The previously available version of K8s 1.19 is not even on the list because of its EOL status.
You may notice the “Disable Monitoring” checkbox. This feature provides additional monitoring of Kubernetes cluster from the Prism Central UI. You may disable it if you want.
On the next screen, we need to specify a lot of the settings. First, a network for our nodes:
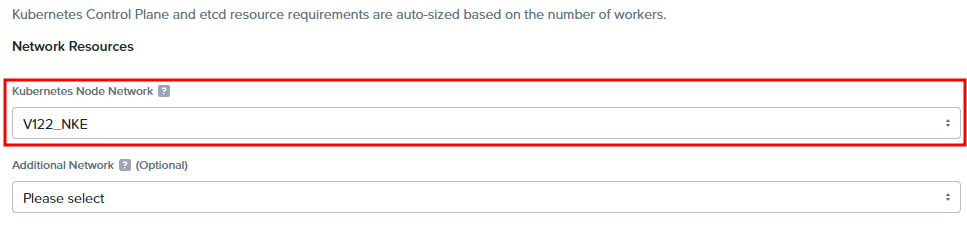
Kubernetes Node Network is the network we’ve created before. Deployed VMs will use this network and receive IP addresses automatically using IPAM.
Only networks with enabled IPAM will be displayed on the list.
Also, you may select an additional network to optimize the node’s I/O. I will go forward without it.
Below, we can specify the worker node count and worker resources by clicking edit:

Keep in mind that you can’t adjust the CPU/RAM/Storage after cluster creation. So consider choosing worker settings wisely. But, you can add a pool of workers with different resources to the cluster later.
Next, we need to decide on the control plane configuration. I prefer to continue with the Active-Passive configuration. For Active-Passive configuration, we need to specify an IP address, which will be used as VIP:
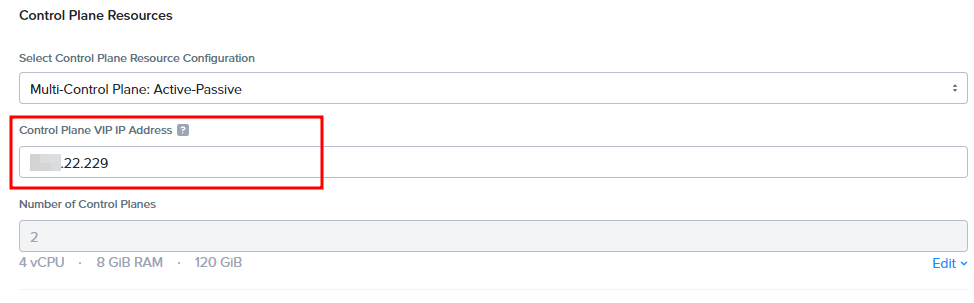
This IP address should be in the same network as the one we selected before, but it should be outside of the IPAM pool.
My IPAM pool uses IP addresses from xx.xx.22.230 to xx.xx.22.240, and I chose xx.xx.22.229 for VIP.
If you decide to use an Active-Active configuration, you need to specify an address for the external load balancer as well as a static IP for each control plane node you want to use.
Also, we can specify control plane hardware resources by clicking edit. This depends on the size of the cluster. I will proceed with the default settings.
Last, we need to select a number of etcd nodes:
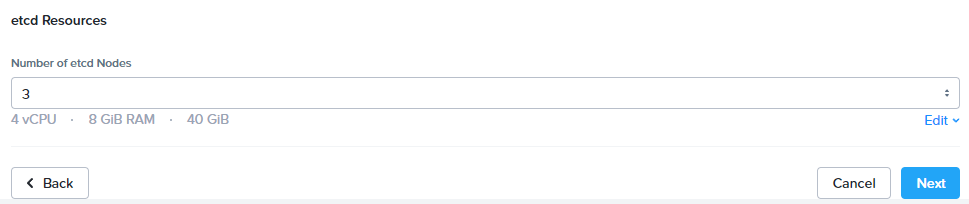
It can be 3 or 5 for the production cluster. As before, we can specify the required resources for etcd VMs.
Click Next. There, we can select a network provider. It can be Calico or Flannel as well. Also, we can specify Service CIDR and POD CIDR ranges:
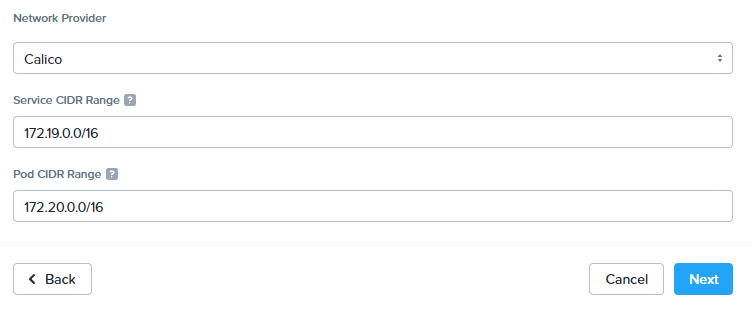
I prefer to use Calico and leave the CIDR fields with the default values.
Click Next. The last step is to configure the Storage Class:
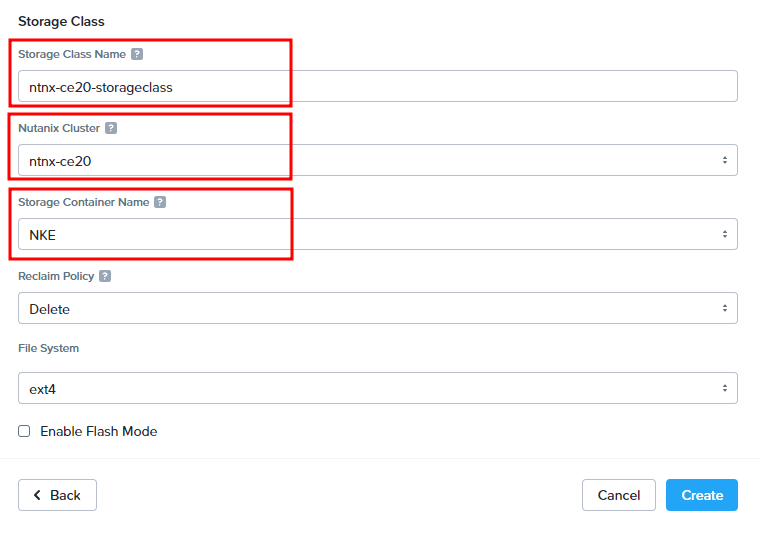
We can set a few settings. The name of the storage class can help us identify the cluster that provides the storage resources.
Nutanix Cluster – is the cluster, where PVs will be stored. Storage Container Name – the same container we’ve created before.
You can also change the Reclaim Policy to Retain and the File System to XFS.
Now click on the Create button to begin the cluster creation process. Under the cluster section, we should see a new cluster and deploying status:

The deployment can take some time. At this moment, NKE is deploying etcd VMs, control planes, workers, and forming the Kubernetes cluster.
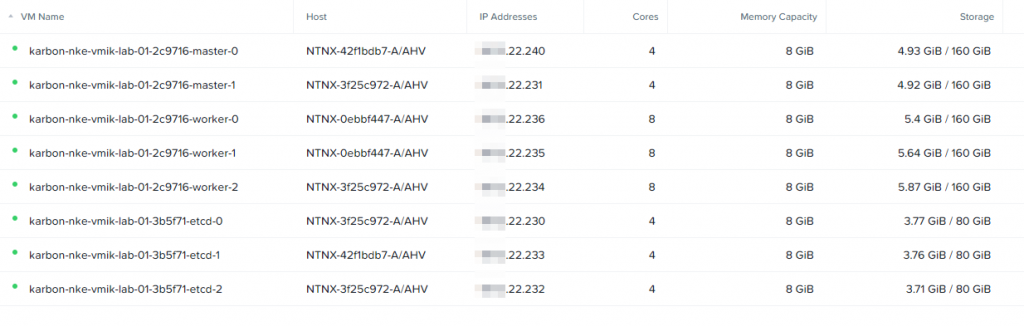
After deployment, we will see a number of VMs in the Nutanix Cluster:
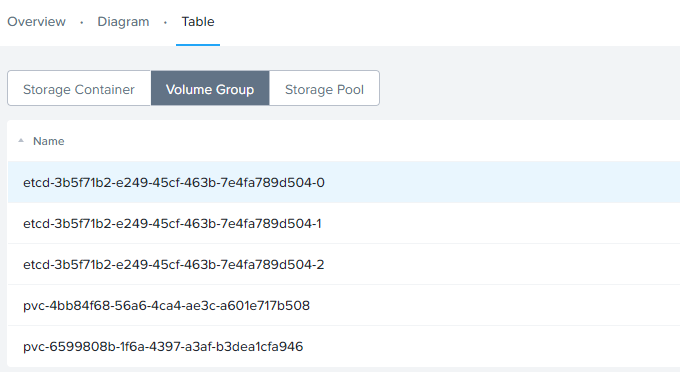
And a few created Volume Groups in the NKE Storage Container:
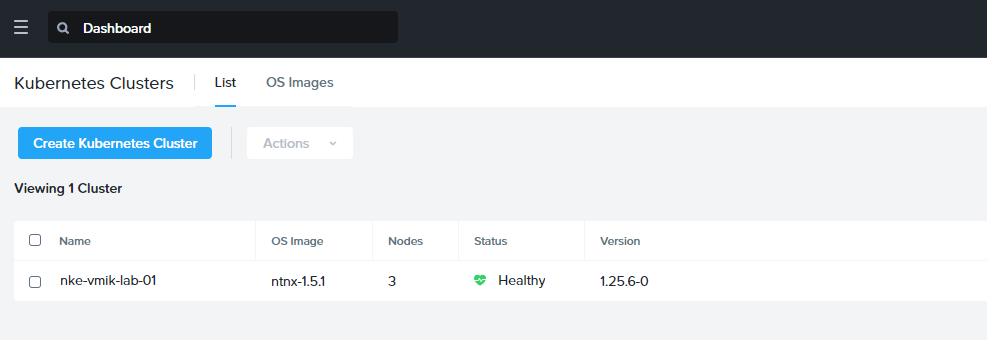
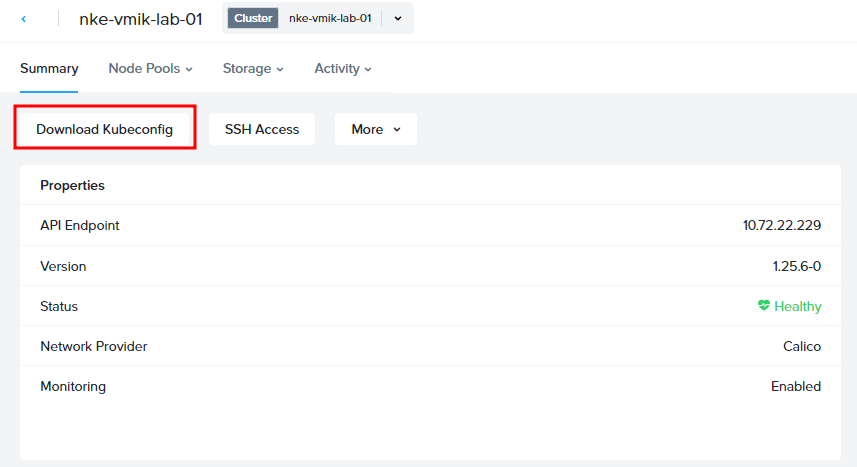
In Prism Central you should see that the cluster is healthy:

We can click on the cluster name and observe the cluster status:
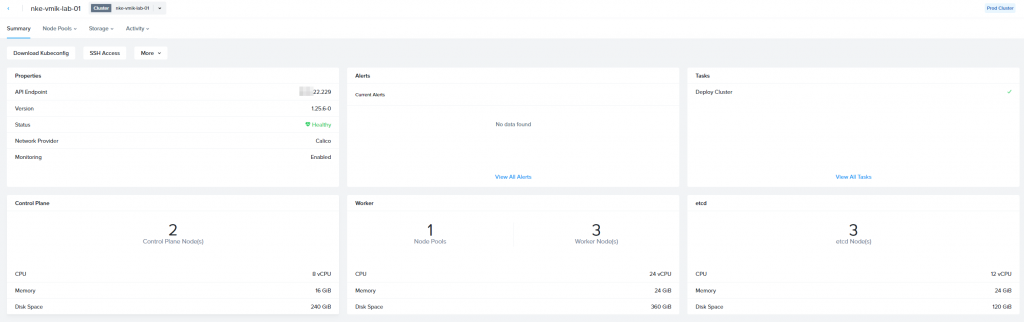
All day-two operations, including update, expand, shrink, and so on, can be done from this window. We will talk about it in the next articles.
Now, when we have an up-and-running Kubernetes cluster. Let’s connect to it using kubectl.
There are three ways to get the Kubeconfig file:
- From the UI;
- Using karbonctl utility;
- Using API.
Let’s get a config from the UI. Click on the Download Kubeconfig button:
We can download a config file and copy it to the admin terminal, or copy the already prepared command to the clipboard and paste it to the terminal:
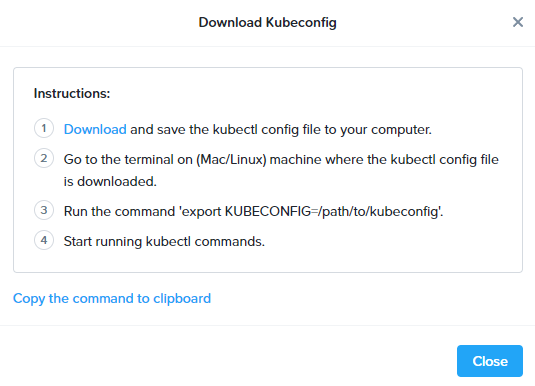
I prefer the second way.
Keep in mind: the access token is generated for 24 hours after the request. And you need to request a new config file each day.
Now we can work with the Kubernetes cluster using kubectl:
[root@k8s-admin ~]# kubectl get nodes
NAME                              STATUS   ROLES                  AGE   VERSION
nke-vmik-lab-01-2c9716-master-0   Ready    control-plane,master   38m   v1.25.6
nke-vmik-lab-01-2c9716-master-1   Ready    control-plane,master   38m   v1.25.6
nke-vmik-lab-01-2c9716-worker-0   Ready    node                   35m   v1.25.6
nke-vmik-lab-01-2c9716-worker-1   Ready    node                   35m   v1.25.6
nke-vmik-lab-01-2c9716-worker-2   Ready    node                   35m   v1.25.6
As expected, we have two control plane nodes and three workers.
Let’s run the first container:
[root@k8s-admin ~]# kubectl run nginx --image=nginx
pod/nginx created
[root@k8s-admin ~]# kubectl get pods
NAME    READY   STATUS    RESTARTS   AGE
nginx   1/1     Running   0          40s
Nginx has been deployed and running. Let’s enable port forwarding to ensure that POD is working:
[root@k8s-admin ~]# kubectl port-forward nginx 80:80
Forwarding from 127.0.0.1:80 -> 80
Forwarding from [::1]:80 -> 80
[root@k8s-admin ~]# curl localhost
<!DOCTYPE html>
<html>
<head>
<title>Welcome to nginx!</title>
<style>
html { color-scheme: light dark; }
body { width: 35em; margin: 0 auto;
font-family: Tahoma, Verdana, Arial, sans-serif; }
</style>
</head>
<body>
<h1>Welcome to nginx!</h1>
<p>If you see this page, the nginx web server is successfully installed and
working. Further configuration is required.</p>
<p>For online documentation and support please refer to
<a href="http://nginx.org/">nginx.org</a>.<br/>
Commercial support is available at
<a href="http://nginx.com/">nginx.com</a>.</p>
<p><em>Thank you for using nginx.</em></p>
</body>
</html>That’s it! We have an operating container in a newly deployed Kubernetes cluster using the Nutanix Kubernetes Engine.
![]()